Developer Guide
Design
{Describe the design and implementation of the product. Use UML diagrams and short code snippets where applicable.}
Implementation
This section describes some noteworthy details on how certain features are implemented.
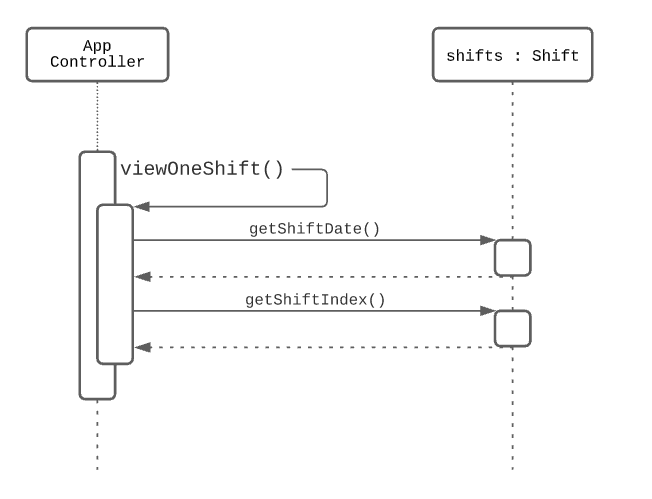
View One Shift feature
Implementation
The current implementation of the View One Shift feature is to call the App Controller from Duke, and when the user requests to View One Shift, they input “view one shift” as a command.
The App Controller then calls the method from its class.
Within the View One Shift method, the user is prompted to provide details regarding the date and shift index they are looking for.
The App Controller will then call some methods in Shift to verify the shift exists, and returns the employees scheduled if any.
Given below is an example usage scenario and how this method works at each step.
This assumes that the data has already been loaded (date: 11/04/2021, shiftIndex: 1, vacancy: 2, employees : [Adam, Eve])
| Step Number | System Output | User Input | Remarks |
|---|---|---|---|
| 1 | Enter Command: | view one shift | user can type in help for a list of commands |
| 2 | Enter Shift date (in dd/MM/YYYY): | 11/04/2021 | date format is specified |
| 3 | Enter Shift index | 1 | Shift index is from 1-6, each index representing a 4 hr block |
| 4 | The people assigned to the shift are: [Adam,Eve] | - | Empty array will be returned if no employee is assigned for the shift |
Step 1: The user launches the program, with the data already loaded. The application then prompts the user for their command.
Step 2: The user inputs a date, and the date is processed by a DateTimeFormatter to ensure that it is in the correct format. This date will be added into the shift ArrayList.
Step 3: The user inputs a shift index, which represents which shift the user is looking for. For instance, index 1 refers to 0000-0400 in the morning, which will be relevant to 24hr fast food chains such as McDonalds!
Given below is what will be shown if wrong/invalid inputs are given
| Step Number | System Output | Wrong User Input | System Output |
|---|---|---|---|
| 1 | Enter Command: | view one Shift | invalid command |
| 2 | Enter Shift date (in dd/MM/YYYY): | 12/05/2021 | Date chosen has no shifts |
| 3 | Enter Shift index | 1 | Shift index selected is not available |
Given below is a sequence diagram of the View One Shift feature
add schedule to employee feature
Implementation
The add schedule feature uses of the Employee class in the employee package to store the schedules of each employee.
The class diagram for the Employee class is as follows:
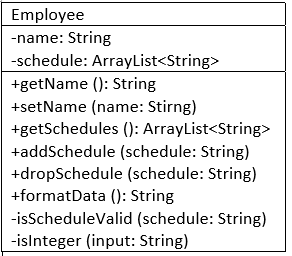
Each Employee object has an employee name, and an arrayList of schedules, together with the functionality to set/get the employee name, get all of the employee’s schedules, add or drop a schedule from the employee object.
The arraylist of schedules contains all of the employee’s schedules. Each schedule is a String which follows certain constraints as described below:
A schedule must be in the format: dd/mm/yyyy
dd must be an integer between 1-31 for odd months, 1-30 for even months, 1-28 for Feb
mm must be an integer between 1-12
yyyy must be an integer between 2021-2099
The validation for a schedule is done internally in the Employee Class through a method called isScheduleValid, which is used in the addSchedule method in the employee class. Only when isScheduleValid returns true, the addSchedule method will add the schedule to the employee.
The logic for allowing the user to add a new schedule is in the EmployeeController class in the employee package and the Employee class in the employee package. The sequence diagram for the interaction is shown below:
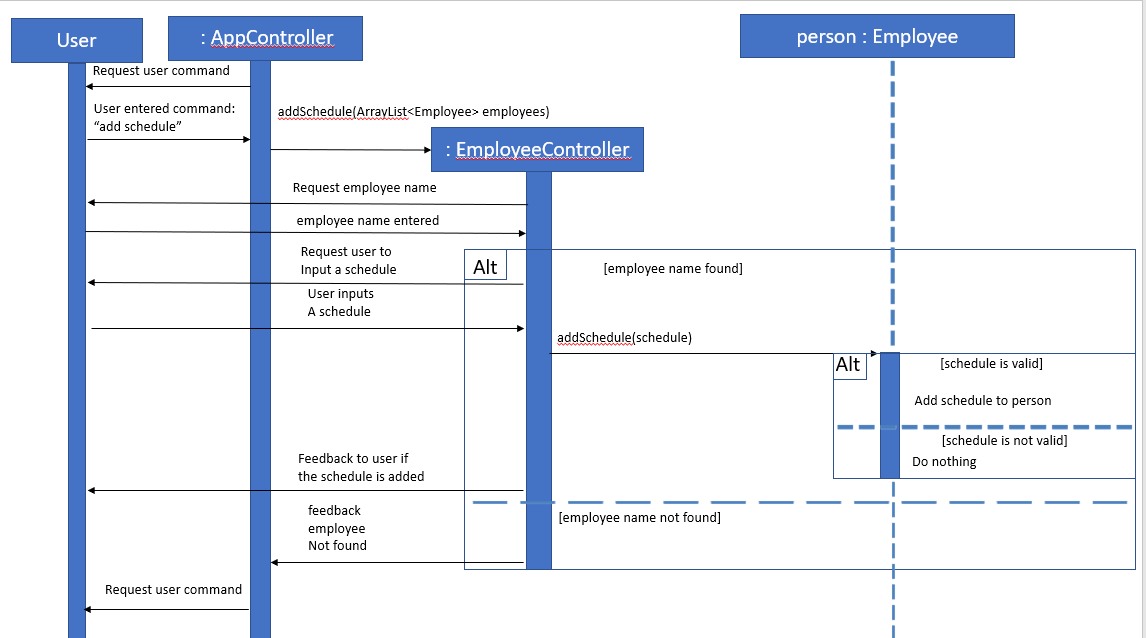
When the user enters “add schedule” in AppController, AppController calls the addSchedule method in EmployeeController.
In the addSchedule method in EmployeeController, the user is first asked to enter the employee’s name that the user wants to add a schedule to.
The method will then check if there is a matching employee from the arraylist of employees in the system (from the employees variable in AppController).
If no employee with the queried name is found, the method terminates with a feedback to the user.
If there is a matching employee, the system proceeds to ask the user to enter a schedule to be added for the employee.
After the user enters a schedule, control is passed to the Employee object, where the schedule is added to the employee if the schedule is verified to be valid.
Control is then passed back to the addSchedule method in EmployeeController, with feedback from the Employee object on whether the schedule is valid or not.
addSchedule in EmployeeController will provide feedback to the user on if the schedule is added successfully, and end the method call by passing control back to the run method in AppController.
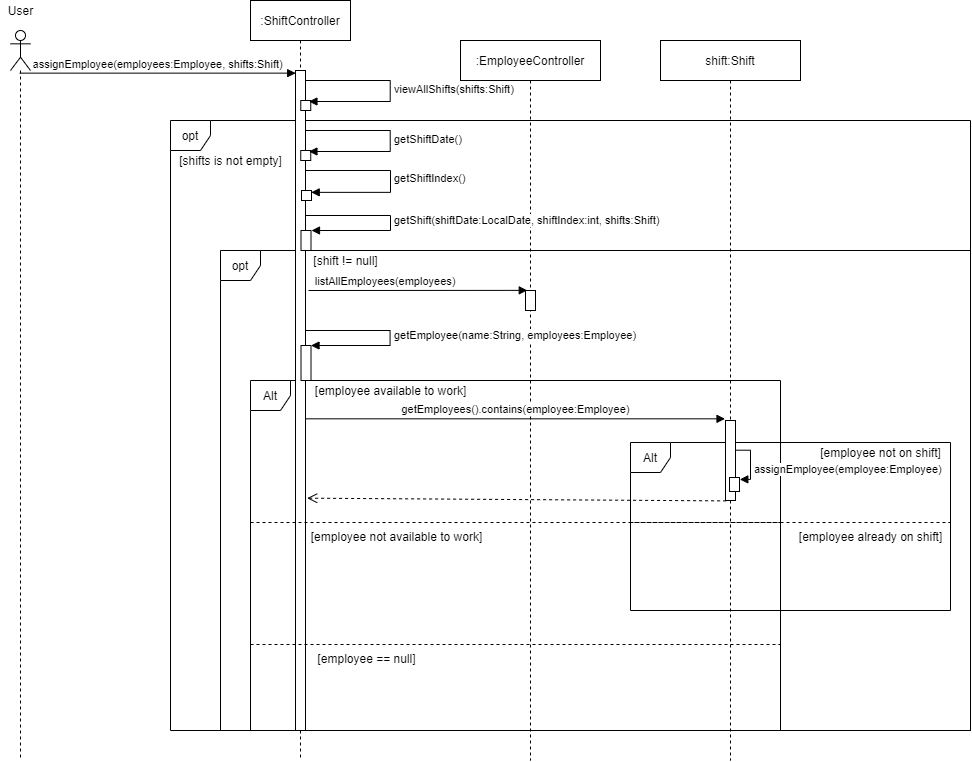
Assign Employee feature
Implementation
The proposed Assign Employee feature is facilitated by the Shift object in the shift package,
where it stores the employees on the shift, its shift date, shift index, and vacancy. It also uses listAllEmployees
method from EmployeeController class, which helps user to view the employees that they can assign to the shift.
This method, like its name suggests, assigns an employee who has an available schedule to a shift that has vacancies.
In version 2.0 and 2.1, exceptions and error-handling are added to ensure bugs are fixed and no longer occur.
Given below is an example usage scenario and how the Assign Employee method behaves at each step.
Step 1: The user launches the application and the Employee and Shift objects are initialised with the saved data.
For this example, we will use the Employee object to store all employees and their schedules, where
employees: [Adam, Eve], and shifts which is an ArrayList of Shift objects. As for Eve, the object will be
initialised such that Eve will be available for schedule on 04/04/2021. The example will use a Shift object
with attributes employees: [Adam], an ArrayList of employees assigned to this shift, meaning Adam is
assigned to this shift, shiftDate: 04/04/2021, shiftIndex: 3, meaning that the shift period is 0800 to 1200,
and vacancy: 1, meaning that there is 1 vacancy left in this shift.
Step 2: The system calls App Controller and prompts “Enter Command: “.
Step 3: The user enters assign employee. This command will call assignEmployee() in App Controller, which then
calls the viewAllShifts() method that will display all the shifts, and their vacancies. shifts.isEmpty() is then run
to check whether there is any shift in the database, in which no shift means no employee will be assigned, and the
method ends here prematurely. Else, the method continues to Step 4.
Step 4: The system outputs “Enter Shift date (in dd/MM/yyyy): “ as getShiftDate() is called.
The user inputs “04/04/2021” and getShiftDate() method returns a temporary LocalDate object. This will be stored as
shiftDate, following which the system will output “Enter Shift index:” as getShiftIndex() is called.
Step 5: The user inputs “3” and getShiftIndex() returns an integer which will be stored as shiftIndex, and
the system proceeds to verify that the Shift object with this particular shiftDate and shiftIndex exists when
getShift() returns a non-null value.
Step 6: The system assigns shift to a temporary Shift object via the getShift() method. EmployeeController then
calls the listAllEmployees() method that displays all the employees in the database that the user can assign to shift.
Step 7: The system outputs “Enter Employee name to assign: “. The user inputs “Eve”, and the getEmployee method is
called, which returns an Employee object that is stored under employee.
Step 8: If employee is a null object, the system outputs “No employee in database. Please add an employee with a
schedule first.” and ends here. Else, employeeAvailable() is called to check whether Eve is available to work
according to the schedule, which will output “Employee Eve is available to work!”. If not, the system outputs
“Employee Eve is unavailable to work!”, followed by “Employee Eve is not assigned to this shift. Please assign another
employee.”, where the method ends here prematurely.
Step 9: Continuing from the fact that Eve is stored under employee, and employeeAvailable() yields true,
the system then checks if Eve is already assigned to this shift by calling shift.getEmployees().contains(). Since
Eve has not been assigned to this shift yet, the system assigns Eve to this shift, where vacancy for this shift
becomes 0 and Eve is added to the ArrayList of employees stored in this Shift object.
Step 10: The system then outputs “Employee Eve is successfully assigned to this shift.”, where the method ends with a success case.
Given below is a sequence diagram of the Assign Employee feature.
Saving of Data
Implementation
The ArrayList of Employee objects is first formatted by adding the ‘#’ symbol as a delimiter between the objects and their attributes.
For example, cactus#23/03/2021, which saves the employee name cactus and the employee schedule 23/03/2021.
This allows data of objects to be easily written into text files and then loaded.
The ArrayList of Shift objects is saved using the same method.
For example, 28/03/2021#5#1#cactus#mario, which saves a shift on 28/03/2021, with a vacancy of 5, and shift index of 1.
The employees on that shift arecactus and mario.
Employee and shift details are saved on separate text files “employees.text” and “shifts.text”.
A FileWriter is used to write formatted data from the Employee and Shift classes, with “#” as the delimiter.
The text files are overwritten with the most recent data whenever the user exits the program by inputting the command quit.
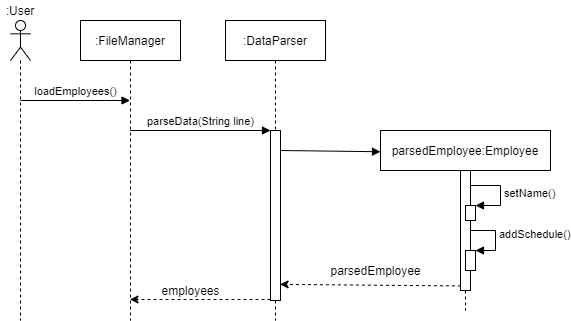
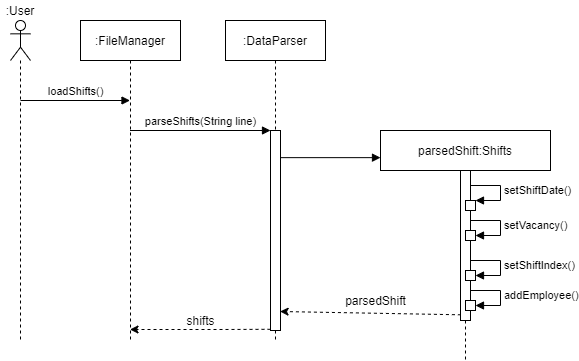
Loading of Data
Implementation
The FileManager Object is first initialized at the start of the program, and loads both
the “employees.txt” and “shifts.txt” files.
The FileManager then parses the data from the text files into the Data Parser object.
The Data Parser then initializes the employee and shift objects, returning an ArrayList of Employees
and ArrayList of Shifts into the program.
The Sequence Diagram for both loadEmployees() and loadShifts() is as shown below:
Product scope
Target user profile
This application is for fast-food restaurant managers who have difficulty in scheduling different employees to the different shift that they have.
Value proposition
{Describe the value proposition: what problem does it solve?}
User Stories
| Version | As a … | I want to … | So that I can … |
|---|---|---|---|
| v1.0 | user | view each of my employee’s available schedules | schedule when to put my employee for work. |
| v1.0 | user | add new employee’s schedules | keep track of changes in the overall record when a single new schedule needs to be added. |
| v1.0 | user | drop any employee’s schedules | manage changes in the employee’s schedule. |
| v1.0 | user | add an employee to a particular shift | schedule an available employee to work on that shift. |
| v1.0 | user | drop an employee from a particular shift | find a replacement if an employee can no longer make it from that shift. |
| v1.0 | user | view all employees working on a particular shift | keep track of the employees working on that shift. |
| v1.0 | user | print the status of all the shifts in a week | easily get an overview of the current week and slot in employees that are available for empty shifts. |
| v2.0 | new user | see usage instructions | refer to them when I forget how to use the application. |
| v2.0 | user | view list of all employees | refer to them while I assign them to shift. |
Non-Functional Requirements
{Give non-functional requirements}
Glossary
- glossary item - Definition
Instructions for manual testing
{Give instructions on how to do a manual product testing e.g., how to load sample data to be used for testing}